Tuesday, November 13, 2018

Outlook Encryption Type Error with Office 365

Office 365 allows you to send email via SMTP based on user authentication. This is commonly used in conjunction with POP or IMAP clients. Where POP or IMAP is used for reading messages and SMTP is used to send the messages. This might also be used by applications and multi-function devices that need to send email.

To send SMTP messages through Office 365, you use the following settings:
  • Server: smtp.office365.com
  • User name: UPN of mailbox
  • Outgoing SMTP server port: 587
  • Encryption type: TLS (STARTTLS in recent versions of Outlook)


If you select the wrong encryption type then Outlook will fail to authenticate. For example, if you select the encryption type as SSL/TLS You get the following error which indicates: "Your server does not support the connection encryption type you have specified."


It's pretty rare to run into this error because most of the time, you'll be using autodiscover to configure Outlook and use the web-based protocols. However, you might run into this if you're testing to verify that an account is working properly as part of troubleshooting an app or multi-function device.

Thursday, October 11, 2018

Querying IP Addresses for EOP using PowerShell

There is always a desire to lock down the communication for Exchange hybrid servers. If you want to lock down a receive connector in your on-premises Exchange for communication with Exchange Online, there is a published list of IP addresses:
The only IP addresses on that web page that are relevant for a receive connector those for Exchange online and TCP port 25. These are the IP address for Exchange Online Protection (EOP).

To simplify automated configuration, Microsoft also makes these IP addresses available in XML format downloadable directly from Microsoft. You can download this using PowerShell.
[xml]$xml = invoke-webrequest -uri https://go.microsoft.com/fwlink/?LinkId=533185
Once you have downloaded the xml file, you can extract just the IP addresses for Exchange Online Protection.

$EopIP = (($xml.products.product | Where-Object name -eq "eop").addresslist | Where-Object type -eq "ipv4").address

Once you have that list of IP addresses, it's easy to configure a receive connector with that list of addresses.

Set-ReceiveConnector -Name O365 -RemoteIPRanges $EopIP


Wednesday, September 19, 2018

Unable to Enable MailUser

It's rare, but occasionally I run into a need to edit Exchange attributes on user mailboxes manually. Last week I had a situation where a user account had no Exchange mailbox, but did have some Exchange attributes populated.

This left me in a scenario where running Enable-MailUser failed for the user accounts. For some of the accounts, blanking out the HomeMDB attribute was sufficient. However, for two accounts, even after blanking out HomeMDB it didn't work.

When I ran Get-User (the Exchange cmdlet) it reported back that the account was already a MailUser. However, if I ran Get-MailUser I got an error back indicating that: "The operation couldn't be performed because object 'username' couldn't be found on 'servername'".

The fix for these two user accounts was to blank out the two additional attributes:
  • msExchRecipientDisplayType
  • msExchRecipientTypeDetails
Once those two attributes were cleared, I was able to use Enable-MailUser as expected.

Additional reading:

Monday, July 9, 2018

Hybrid Configuration Wizard not Starting

I think this is something to do with security permissions, but when I click a link to install the hybrid wizard all I see is a flicker scanning file and then nothing. I tried adding a few site to the trusted sites list.

You can download it directly here:
I'm putting the above link in my blog primarily so I remember where it is. I got this link from the following blog post.

Thursday, June 21, 2018

OneDrive Stops Syncing - Insider Preview

On my laptop, I run Windows 10 Pro Insider Preview current build 17692.1000. I am guessing that my OneDrive issue was related to that. It seemed to happen after a recent update, but I'm not 100% sure.

Here were my symptoms:
  • No errors presented in user interface (that is, I didn't know it was broken)
  • Worked on my laptop for a couple of days
  • Attempted to open file from my desktop and got old version
 Looking back at the laptop, I could see:
  • OneDrive icons in notification area were gone
  • Attempting to run OneDrive from the Start menu indicated that OneDrive.exe was missing.
  • OneDrive status was blank when viewing files in File Explorer.
 Some random searching came up with:
  • Modifying Group Policy settings to allow sync
    • Failed - because it wasn't even running!
  • Run OneDriveSetup.exe from C:\Windows\SysWOW64
    • Failed - error indicated a newer version was installed
  • Run OneDrive.exe from %LocalAppData%\Microsoft\OneDrive
    • Failed - file was not present
However, at this point, in %LocalAppData%\Microsoft\OneDrive, I saw there was a file OneDriveStandaloneUpdater.exe. I tried running that with no fix.

I browsed around a bit more and found OneDriveSetup.exe in the %LocalAppData%\Microsoft\OneDrive\Update folder. I ran this file and I got the dialog box indicating that OneDrive was being prepared for first use. When it completed, it kept the settings for both my personal and OneDrive for Business. The only hiccup was that the file I was working on over the last two days was listed as a conflict that I needed to resolve.

As much as this annoyed me, I think this shows how much better the OneDrive client is than it used to be. Not that long ago, almost any syncing problem was fixed by resyncing and downloading all of the data again. This properly recognized and retained a few GB of data only having an issue with the file that was modified while OneDrive wasn't running. That's pretty good.

Update June 26, 2018
Well this happened again, and I found an event log error that looks like the setup file for OneDrive was trying to run and failed. I was able to find this error for today and the previous event where it failed. Both were event ID 1001 which is pretty generic. The P5 value was different on the previous error.


I was able to confirm that running OneDriveSetup.exe alone was enough to fix the issue.

Thursday, May 31, 2018

Bye Bye FRS

As of build 1709 (that is September 2017), Windows Server 2016 does not support using FRS (File Replication Service) for the replication of SYSVOL data on domain controllers. Some of you are saying: "Man, that's old. Who uses that anymore?" Well, anyone that never bothered to update which is probably most small and even mid-sized businesses who have been updating to a new OS version over the years, but didn't realize they had a choice for SYSVOL replication.

The good news is that the update is really easy to do. The steps are as follows:
  1. Run dfsrmig /setglobalstate 1
  2. Wait until dfsrmig /getmigrationstate says all domain controllers have updated to state prepared
  3. Run dfsrmig /setglobalstate 2
  4. Wait until dfsrmig /getmigrationstate says all domain controllers have updated to state redirected
  5. Run dfsrmig /setglobalstate 3
  6. Wait until dfsrmig /getmigrationstate says all domain controllers have updated to state eliminated
A very nice writeup for this process with screenshots is located here:
Notification that Windows Server 2016 version 1709 no longer support FRS is here:

Wednesday, May 30, 2018

Expired Microsoft Exchange Server Auth Certificate

When you install your first Exchange Server 2013 or Exchange Server 2016 server, a certificate with the friendly name Microsoft Exchange Server Auth Certificate is created. This certificate is self-signed and used for OAuth authentication between applications such as Exchange Server and SharePoint. However, it is also used for hybrid deployments between on-premises Exchange Server and Exchange Online.

This certificate is unique because it is installed on all of your Exchange servers. The subject for the certificate is "CN=Microsoft Exchange Server Auth Certificate" and does not contain any SAN names with references to specific servers.

It also has a 5-year lifetime. Which is just long enough for everyone to forget about it. I suspect that this certificate is due to expire in many organizations soon.


Today I got a call from an organization with the following symptoms:
  • Outlook clients were slow to start
  • Outlook clients were not displaying the user's calendar
  • Outlook clients were not able to access Out-of-Office settings
  • Everything was functioning fine the previous day
  • No system changes had been made
  • The organization is configured in hybrid mode with Exchange Online, but the issue was occurring for on-premises users
  • Accessing through OWA was unaffected
An initial review of the configuration didn't identify anything out of the ordinary except that the Microsoft Exchange Server Auth Certificate had expired about two weeks ago. There was also this related event in the Application log:


The event information is:

  Source: MSExchange Web Services
  Event ID: 24
  
  The Exchange certificate [Subject]
  CN=Microsoft Exchange Server Auth Certificate

  [Issuer]
  CN=Microsoft Exchange Server Auth Certificate

  [Serial Number]
  3329C02443B435A447B92E81EB177303

  [Not Before]
  2013-06-11 6:25:31 PM

  [Not After]
  2018-05-16 6:25:31 PM

  [Thumbprint]
  DFC06BF3FC76974BCD1C050340998B65D5491007
  expired on 2018-05-16 6:25:31 PM.

This certificate is not bound to IIS, so why is this expiration being noted by MSExchange Web Services?

The certificate used for authorization is set separately from IIS but is configurable. You can see the currently configured certificate by using Get-AuthConfig. The thumbprint for the certificate is listed in the CurrentCertificateThumbprint property.


If you've already been searching around related to this certificate, you've probably found some instructions on how to recreate it. However, if it is expired, you can just renew it instead by using the Exchange Admin Console. In servers > certificates, select Microsoft Exchange Server Auth Certificate and then click Renew in the details pane as shown below. The screen shot below is of a certificate that is not expired yet, it looks exactly the same other than the expiry date.

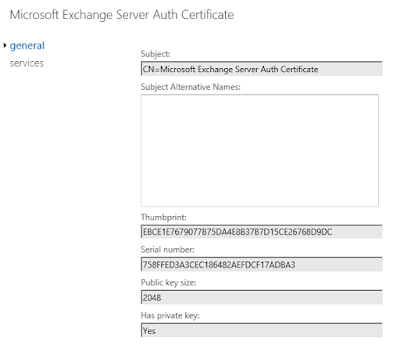
Renewing creates a second certificate named Microsoft Exchange Server Auth Certificate that is valid for another 5 years. This certificate has a new thumbprint and exists only on the server you've renewed it on. You need to identify the thumbprint for the new certificate. If you edit the certificate, in Exchange Admin Center, the thumbprint is on the general tab as shown below. You can type this in, but you're probably better of to cut and paste it into the later commands.


My preference is to put the required information for the next command into variable. We need the thumbprint of the new certificate and the current date.

$thumb = "NewCertificateThumbprint"
$date = get-date

Then run the following command to add the new certificate:

Set-AuthConfig -NewCertificateThumbprint $thumb -NewCertificateEffectiveDate $date

You will get a warning that the new effective date is not 48 hours in the future. However, if we're recovering from an expired certificate, we're OK with that.

Now you need to publish the certificate to all servers:

Set-AuthConfig -PublishCertificate

And finally, remove the old expired certificate from the configuration:

Set-AuthConfig -ClearPreviousCertificate


Finally, since we've removed all references to the expired certificate you can delete it from all Exchange servers.

You may find that you need to do an iisreset after all of the AuthConfig changes were done. I found some examples where they ran iisreset.exe and didn't take the time to experiment. It's possible that it will pickup without a restart but just take longer.

I've added another post related to the Auth certificate and hybrid deployments here:


Tuesday, May 29, 2018

Windows Update 0x800705b4 (Windows Server 2016)

While setting up a new server running Windows Server 2016, I had the install of the latest cumulative update (May 2018) failing with error code 0x800705b4.

When I searched about this error there were a lot of articles describing how to reset Windows Update and potentially solve this issue. Most of those pertained to Windows 10.

For Windows Server 2016, I found a quick and easy solution. Download and install the update by using sconfig instead. Apparently sconfig uses a different process for installing updates than the graphical interface.

First, open a PowerShell prompt or command prompt as Administrator:


Select Option 6 to download and install updates. This opens another window:


Select whether you want to list all updates or just recommended updates. And then select which updates you want to install. After installation, you'll be prompted to restart just like the standard update process.


Tuesday, April 17, 2018

Using Saved Credentials with PowerShell Scripts

Most of the time in a Windows environment, a Windows PowerShell script runs in the security context of the user account that is running it. If you have a scheduled task that runs a PowerShell script then you can specify a user account (service account) that is used to run the task. The service account needs to be assigned the necessary permissions to perform any actions in the script.

In some cases, you need to script to access remote resources and sign in. For example, if you have a scheduled task that pulls reporting information from Office 365. PowerShell has a method for storing encrypted credentials that can only be accessed the user account that stored them. The code below prompts you for a credential and then stored is encrypted in an XML file.

$credential = Get-Credential
$credential | Export-CliXml D:\credential.xml

To retrieve the credential and using it within a script, you read it from the XML file:

$credential = Import-CliXml D:\credential.xml

If you created the XML file while signed in as your account and then attempt to read it from a script running as a service account, it will fail because it can't be decrypted. Information in the correct user profile is required to decrypt the credential in the XML file. This also means that the encrypted file cannot be moved to another computer because the information required to decrypt the credential is not available on other computers.

To prepare a credential for use with a scheduled task, you can sign in as the service account to create it. This works if the service account has permission to sign in interactively or via remote desktop. However, I'm often in scenarios where I remote in to client sites as a specific user account and don't have the option to sign in directly as the service account.

If you can't sign in directly as the service account, you can spawn a new PowerShell prompt that runs as the service account and then create the XML file from the new PowerShell prompt. Use the following command to spawn a new PowerShell prompt and enter runas credentials:

Start-Process powershell.exe -Credential ""

Sign in as the service account when prompted with credentials. Then you can create an XML file with credentials that can be read by the service account when the script runs.

Note that in some cases, you need close your initial PowerShell prompt before you can enter commands in the new PowerShell prompt. This seems to vary by operating system and I've not mapped out the exact dependencies.


Monday, April 16, 2018

Front Panel Mic Input Generates Static

I recently learned that many computers suffer from high levels of static when using the microphone input on the front of the computer. My computer certainly has that issue, but I didn't realize it was  common.

The static is caused by interference from signals on other cables. The front microphone connector is connected to your mother board by a long thin unshielded cable. So, there are plenty of power cables for devices such as hard drives or USB that can cause interference. On my computer I was able to get rid of the static by unplugging the front USB ports from my mother board. However, that was very annoying when I wanted to use USB devices.

My laptop doesn't have the static issue for the microphone. I'm assuming that's because the connector is directly on the motherboard like the back connector on my computer. The back mic port on my computer also does not have static. However, it's awkward to access the rear ports.

The fix for my old headset was to buy an inexpensive (cheap) USB sound card. The USB sound card had mic and headphones inputs on it. Using this I had no interference at all. The microphone sounded great. This is the one I was using: https://www.memoryexpress.com/Products/MX57856

My wife needed a new headset and I took this as an opportunity to pass mine along and get a new one for me. I purchased the Sennheiser GSP 300 and tried using the same cheap USB sound card. However, the microphone in this particular headset wouldn't work with my cheap sound card. It worked fine plugged into a normal mic port but on in this sound card, not at all. My best guess is that the noise cancellation feature may be the issue.

This left me with two options:
  1. Get a better USB sound card for $50-$70 and hope.
  2. Get a headset with USB connectivity.
Since the next model up of headset was another $70, I figured I was better off to just pay for the better GSP 350 model and skip the risk of a better USB sound card having the same issue.

I think the moral of the story is to use USB connectivity for microphones with most desktop computers.


Thursday, March 22, 2018

Update Source Anchor to ms-DS-ConsistencyGUID

A key part of most Office 365 deployments is directory synchronization with on-premises Active Directory (AD). To maintain a link between individual object in AD and Office 365, one attribute in AD is defined as the source anchor. The source anchor acts as a unique identifier for each object so that you can change properties like UPN and have them replicate to the proper matching object in Office 365.

Older versions of Azure AD Connect used the objectGUID attribute as the source anchor. In many cases, this is a good choice because it is an attribute that doesn't change. However, in complex configurations with multiple AD forests, this can cause an issue during migrations. When a user account is moved from one AD forest to another, it gets a new objectGUID in the new forest. Due to the new objectGUID , Azure AD Connect treats the user as a new user instead of an existing user.

To avoid this issue, we need to use an attribute for source anchor that can be moved between forests. Microsoft now recommends that deployments of Azure AD Connect use the mS-DS-ConsistencyGuid attribute as the source anchor. Unlike objectGUID , this attribute can be modified. So, it can be maintained when users are moved between forests.

I've just recently completed this process and I'll provide some general guidance (for my own reference) and a few items that I didn't see anywhere else.

Updating the Source Anchor

First, read the information from Microsoft on updating the source anchor. You'll need to scroll down a bit to the heading "How to enable the ConsistencyGuid feature - Existing deployment".
This documentation provides click by click instructions on how to use the Azure AD Connect configuration wizard and work through the Change Source Anchor option. This wizard will:
  • Require you to enter Azure AD credentials for a global admin
  • Require you to enter a user account with AD FS admin permissions (if integrated with AD FS)
  • Do a prerequisite check
  • Update necessary settings in Azure AD
  • Update necessary settings on connectors for all connected forests
  • Update AD FS claim rules
If you're like me, before attempting this you'll scour the web looking for information about how to fix things when they go wrong. Unless things change a lot after I write this, you won't find much. The reason you won't find much is because the wizard does exactly what it's supposed to.

Note: The wizard does not ask you which attribute you want for the source anchor. It is assumed that you want to use mS-DS-ConsistencyGuid.

Change Details

When the wizard is done, a full sync is triggered for all connected forests. As part of the full sync Azure AD Connect reviews the value of the mS-DS-ConsistencyGuid attribute. If the value is blank, the objectGUID value is copied into the mS-DS-ConsistencyGuid value. Then on the next sync cycle the mS-DS-ConsistencyGuid value is sent to Office 365.

If you are using AD FS, the wizard updates the AD FS claims rules for Office 365. I didn't do a detailed review of the rules, but it seems to be similar (if not the same) as the rules Microsoft documents for you to make manual changes. You can see these rules here:
The Modify AD FS Claim Rules section in the above link has four rules. The net effect of these rules is to use mS-DS-ConsistencyGuid if it is populated and use objectGUID otherwise. This avoids downtime when AD FS rules have been modified but the mS-DS-ConsistencyGuid hasn't been populated yet.

Permissions to mS-DS-ConsistencyGuid

If you have let the installation and configuration wizards for Azure AD Connect manage all of the service account permissions and AD FS integration, there should be no issues. However, if you've been manually configuring the permissions and AD FS rules, you might need to make changes manually.

The only permission change required when changing the source anchor is ensuring that the service account in each domain has read and write permissions to the mS-DS-ConsistencyGuid attribute. Unfortunately when you attempt to assign these permissions by using Active Directory Users and Computers, you find out that the attribute is not displayed in the GUI for modifying permissions. To set the permissions, use the following command (please note that this is a single line):
dsacls.exe "dc=contoso,dc=com" /I:S /G "contoso\serviceaccount:RPWP;mS-DS-ConsistencyGuid;user"

The above command grants (/G) inheritable (/I:S) permissions to the service account to read (RP) and write (WP)  the mS-DS-ConsistencyGuid attribute on user objects.

Verifying Successful Implementation

Obviously after a successful implementation, your users can still sign in to Office 365, but there are a few other things you can verify:
  • Review the AD FS claim rules for Office 365 and verify that they were modified.
  • Review the mS-DS-ConsistencyGuid attribute on several user objects to verify that it has been populated.
On one deployment, we had an error in the Azure AD Connect full sync for one domain immediately after finishing the wizard. The domain that finished properly updated the mS-DS-ConsistencyGuid attribute and the domain with the error didn't. Running an incremental sync didn't fix it. We needed to force a full sync again to get the attribute updated properly.

When viewing the value of the mS-DS-ConsistencyGuid attribute in Active Directory Users and Computers, the value might be displayed in special characters for some users. This is a display error in Active Directory Users and Computers. This is not something you need to fix.

For Further Reading


Tuesday, March 13, 2018

O365 Removing Mobile Device Fails in Portal

A client has an issue in their Office 365 tenant that started yesterday (March 12/18). When attempting to delete a mobile device linked to a user, it fails and gives the following message:
Error on proxy command "Remove-MobileDevice -Identity:'DeviceName' -Confirm:$false to server...the mobile device DeviceName cannot be found...

Error when removing mobile device
I was still able to remove the device by using a Windows PowerShell prompt connected to Exchange Online. But what I noticed is that for the Remove-MobileDevice cmdlet to work, I needed to use the Identity property from the mobile device rather than the Name property that the Exchange admin portal was attempting to use.

Using Windows PowerShell to remove the mobile device
You can see in the screenshot above using the Name or DeviceID properties didn't work. Only the Identity property which includes the full path with the user name works.

I've opened a support ticket with Microsoft and we'll see what they come back with. It was not a know issue when I contacted them, but they're going to do some checking on the back end. I will update this blog post when there is a resolution.

UPDATE: March 14/18
So, support indicates that it's definitely an issue, but to raise visibility with the support team they asked me to create an "idea" at office365.uservoice.com. This location seems more for feature requests than bug fixes. However, I've put an "idea" in. I'll continue to update as I learn more.

If you are also experiencing this issue and want to raise its visibility, go to this link and vote it up:
UPDATE: April 17/18
My client has informed me that this issue has been fixed. I'm not sure the date, but you should no longer see this problem.

Saturday, January 27, 2018

Outlook on the web offline access failure

There is a bug in Exchange Server 2016 CU6, CU7, and CU8 that prevents clients from using offline access for Outlook on the web. It was working properly in CU5.

In CU5, in Options, you select Turn on offline access and then another window pane is shown that asks whether you have exclusive use of the computer or not. In CU8 (also CU6 and CU7), that pane appears very quickly and then goes away. Basically the text flickers but it is removed right away. You can see a video of this behavior below.


I tested this with Internet Explorer, Edge, Firefox, and Chrome with consistent results. I also tested this using both Windows 10 and Windows Server 2016 as the client operating systems.

After trying everything I could think of for testing, I posted this issue to the Microsoft support forums and they confirmed that this is a bug and will be fixed in a future update.

Wednesday, January 24, 2018

Install-AntispamAgents.ps1 Fails for Exchange 2016 CU7 and CU8

Not many organizations enable the antispam agents on their Exchange servers since they're probably paying for an additional service to do spam filtering. However, if you attempt to enable it on Exchange Server 2016 CU7 or CU8, there is an error in the script that you need to run. As of right now, CU8 is the latest update available so, this may continue in later updates.

To enable the antispam agents in Exchange Server 2016, you run the Install-AntispamAgents.ps1 script located in C:\Program Files\Microsoft\Exchange Server\V15\Scripts. However in CU7 and CU8, you get an error like this:
There are several screens of error information, but the key part is:
A parameter cannot be found that matches parameter name 'EscalationTeam'.
If you open the script and go to line 50, you'll see the following at the end of the line:
If you delete the following text from that line, the script works properly:
-EscalationTeam "AntiSpam";
Please note that this script does have a digital signature. Editing the script invalidates the digital signature. So, to run this script ensure that your execution policy is not set to AllSigned. It will run fine with execution policy set to either Unrestricted or RemoteSigned.

Monday, January 22, 2018

All Certificate Names MUST be in Subject Alternative Names

This has been popping up for a while, but it's worth pointing out again. When you get a SAN/UCC certificate, the DNS name that you use for the subject (common name) also needs to be in the subject alternative names attribute.

For example:
  • Subject:
    • webmail.contoso.com
  • Subject alternative names
    • webmail.contoso.com
    • exch1.contoso.com
    • exch2.contoso.com
    • Autodiscover.contoso.com
When you get your certificate from a public certificate authority (CA), most of them ensure that the subject is also added as a subject alternative name. However, some might not and you should watch for it.

It's important to note that the Microsoft CA does not automatically add the subject to the list of subject alternative names. So, make sure that you do it as part of your certificate request for your internal CA.

The reason you need to do this is because of how web browsers are processing subject alternative names. Web browsers are ignoring the subject if a list of subject alternative names is present. All web browsers seem to be enforcing this now. A few years ago, the web browsers would process both the subject and the subject alternative names.

Here's the quote from RFC 2818 from May 2000 (yes, that long ago):
If a subjectAltName extension of type dNSName is present, that MUST be used as the identity. Otherwise, the (most specific) Common Name field in the Subject field of the certificate MUST be used. Although the use of the Common Name is existing practice, it is deprecated and Certification Authorities are encouraged to use the dNSName instead.

As a slightly interesting side note. The subject field is optional when SANs are defined. However, some older software might still require the subject to be defined.

If you are configuring certificates in Exchange server, be aware that the Exchange admin console (EAC) does not properly differentiate between subject and subject alternative names. In the certificate shown below, webmail.adatum.com is in the subject and not in subject alternative names. EAC (Exchange 2016 CU8) is including the subject in the Subject Alternative Names box which can be misleading.